Vivo Y83 Pro is next iteration of Vivo Y83. It comes with 4GB RAM and 64GB Internal storage, an upgrade from Y83 with 32GB Internal storage, and a dedicated SD card slot.
Now, let’s get right into it:
- Display: It’s the first phone to have a notch on the display at Rs. 15,000 in India. It comes with 6.22-inch IPS HD+ display, with 2.5D curved corning gorilla glass.
- Cameras: It has dual cameras on the Rear: 13 megapixel with f/2.2 aperture + 2 megapixel with f/2.4 aperture. On the Front: 8 megapixel with f/2.2 aperture.
- Portrait Mode: Just like previous Vivo Phones, this phone also offers Portrait mode on front and rear cameras.
- Processor: This phone has a Helio P22 made with 12 nano-meter architecture, with 4GB RAM and 64GB internal storage.
- Navigation Gestures: These gestures resemble the ones on iPhone X. You can swipe up from the right navigation button to go back. Swipe up from the center one to go home and swipe and hold for recent apps.
- Double Click to Light: Just like the name suggests, it lights up the display when you double tap. It’s another name for Double Tap to Wake.

- Dedicated SD Card Slot: It’s very rare to see dedicated SD Card Slot in this price segment. The phone has 64GB internal storage and on top of that, you can add a memory card. So, you wouldn’t have to worry about storage issues.
- Fingerprint Scanner: The fingerprint scanner on this device is super fast. Just like It’s predecessor Vivo Y83.
- Face Unlock: It doesn’t have IR sensor or the Iris scanner. It just uses the front camera to unlock the phone. It’s pretty fast. It’s just as fast as Vivo Y83.
- Camera Gestures: There are three camera gestures; one of them is Touch, where if you enable it, you can take a photo by just tapping on the screen.
Other two are Voice, and Palm.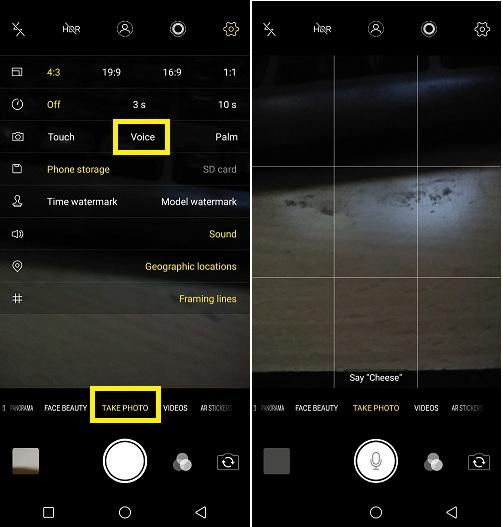
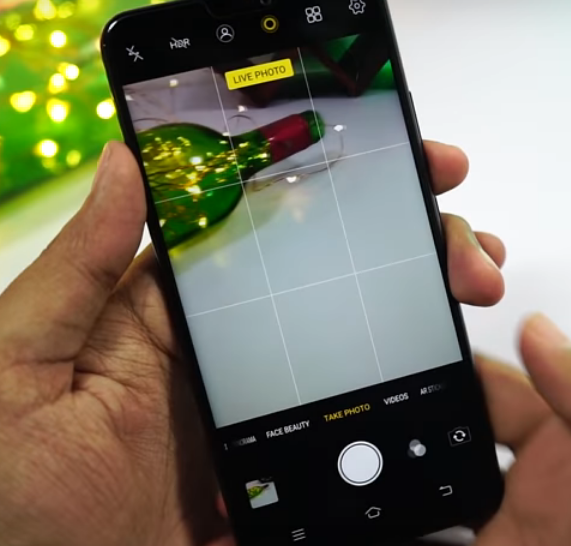
In Voice, you have to say Cheese and it will take a picture. In Palm mode, you can show your palm and it takes a picture. - Live Photo Mode: Once you enable this and take a photo, it adds few seconds of ‘video’ to the picture. So, when you go to gallery, tap and hold on the picture, it shows the few seconds that it recorded.
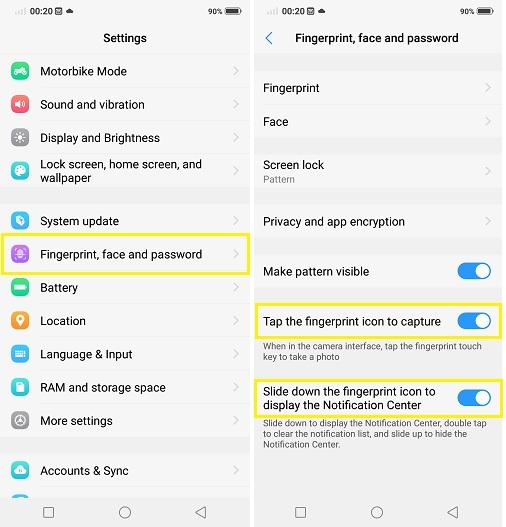
- Finger Gestures: You can pull down the Notification Bar just by swiping down on the Fingerprint Scanner after enabling this feature. This is a handy feature as the phone has a massive display and reaching the top might get difficult.Also, you can take a photo with just a Touch on Fingerprint Scanner. To enable these two features, go here:
After this, you can take selfies in a much easier way. And swipe down the notification bar, easily, to see those likes just going up. - App Clone: Have you ever tried managing two profiles or two accounts, maybe for your business and personal, but didn’t do it because logging in and out every time to switch accounts was a problem?
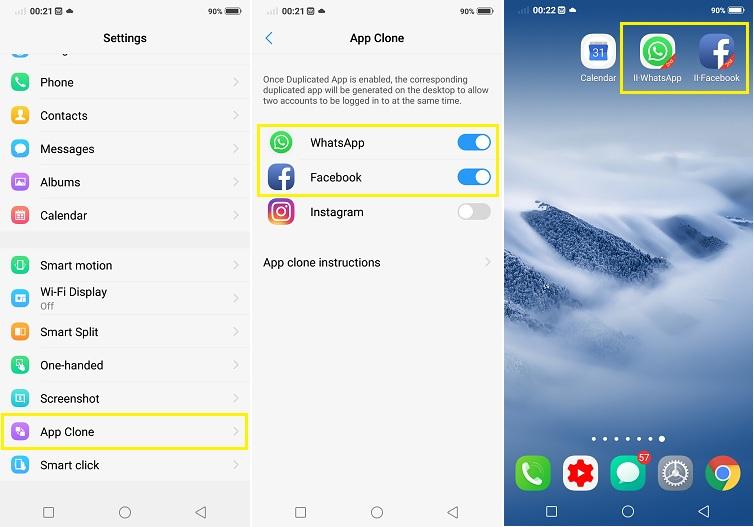 If you want two sets of the same app, maybe for your business account or a different page you’re managing, this App clone feature will help you to create another set of the same app. This will enable you to use both the accounts on the same phone without having to log in/out all the time.
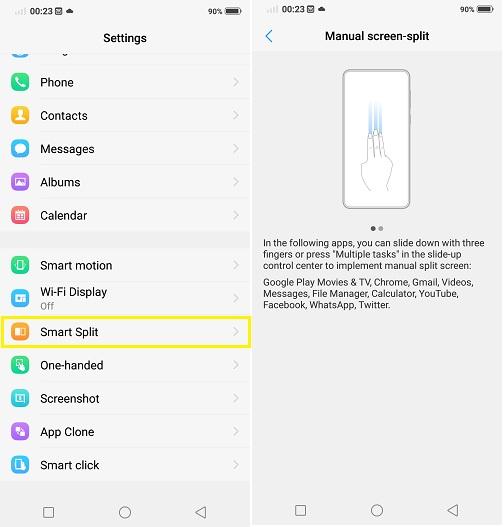
 - Smart Split: Smart split is nothing but multitasking by splitting two apps in one screen. Although, this is an old feature, Vivo V9 has a stripped down version of it. This doesn’t work on all apps, but the ones it works on, you can just do a 3 Finger swipe-down gesture to split the screen and add another app.
- Smart Click: Now, this is useful in emergency situations. If there’s a power cut and you need Flashlight, just assign that to Smart Click and bingo! You now don’t have to open the phone and then search for the light, just click and hold the volume down button and your flashlight is on.
You can assign any feature to the smart click.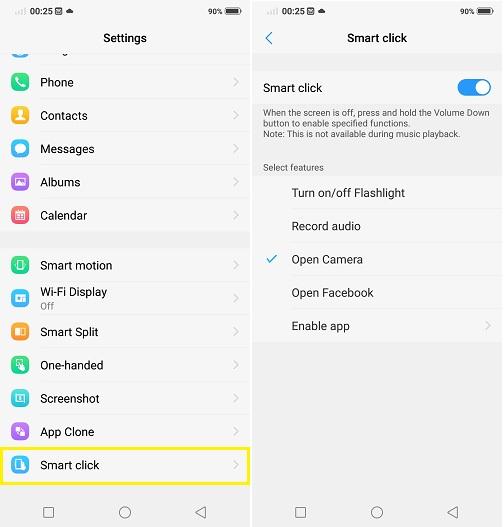
- One Handed Mode: Do you have tiny hands and the phone’s too large? Don’t worry, here’s one-handed mode to the rescue.
It just resizes the screen to a smaller version on the side of your choice, left or right. Enabling this will make reaching the top part easier.
Also, it’s very handy for anyone who doesn’t want to use both their hands to navigate through the phone.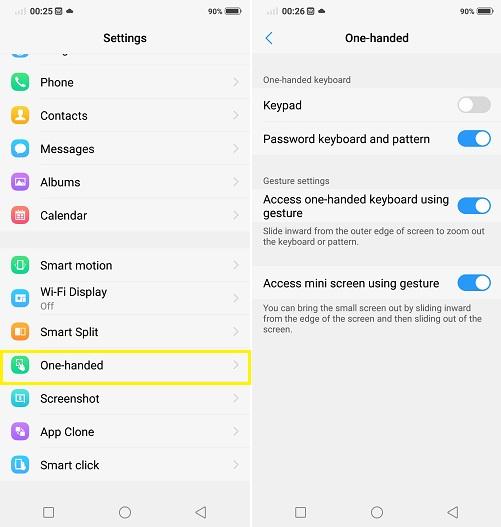
- 3 Finger Screenshot: By just swiping up with three fingers you can take a screenshot.
If you struggle taking a screenshot by pressing both the volume down button and the power button at the same time, just enable this feature and enjoy.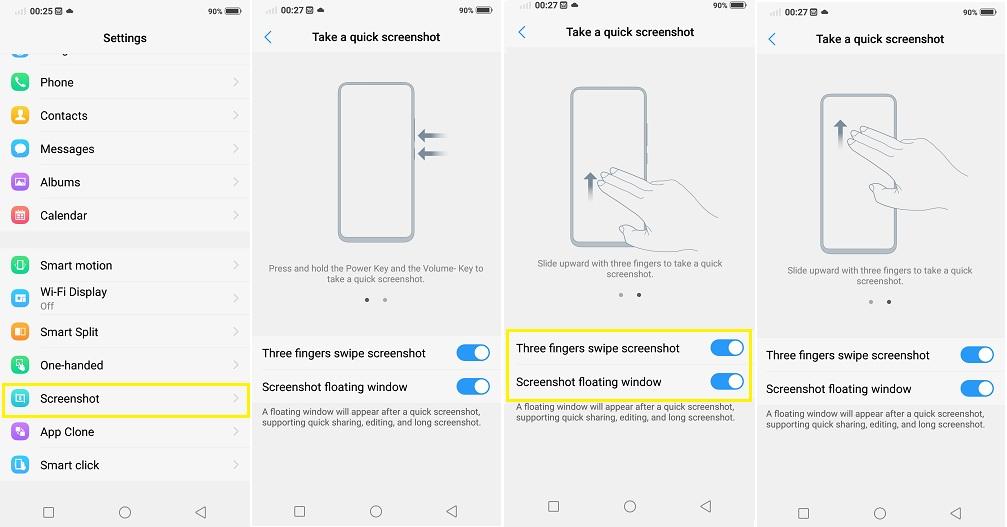
- Long Screenshot: It is an option where you can take a screenshot of the whole screen while you scroll it. Whenever you take a screenshot, there’s an option available right under the screenshot preview at top right corner that says, ‘Long screenshot’. You can just press it and start using the option bar that is displayed on the right.
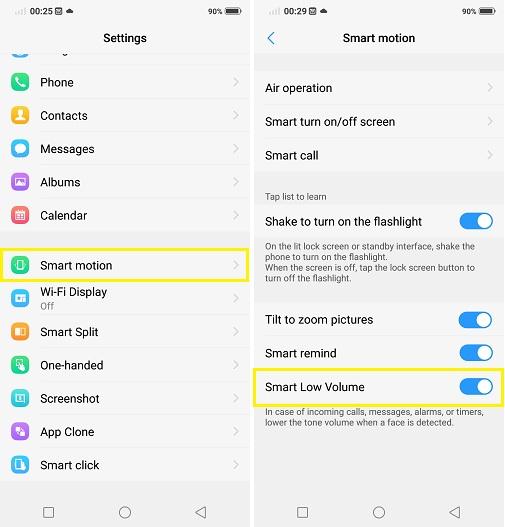
- Air operations:Glance: You can enable this by going here: Settings → Smart Motion → Air Operations → Black Screen Glance. Once you enable this, just wave over the proximity sensor and it’ll display time.This also drains the battery unnecessarily.
Air Unlock: There’s another option right under Black Screen Glance that’s Air Unlock. If you don’t put any passwords on your phone, then just waving over the proximity sensor will unlock the phone.
- Double tap to sleep: Double tap to sleep feature easily locks the phone screen. Rather than pressing the power button or waiting for it to lock by itself, you can double tap an empty area on the home screen to lock the screen.

- Rise To Wake: This is a handy feature. As the name suggests, once you enable this and pick up your phone, the screen lights up and shows you the lock screen. If Face Unlock is also enabled, it’ll just unlock the phone as soon as you pick it up.
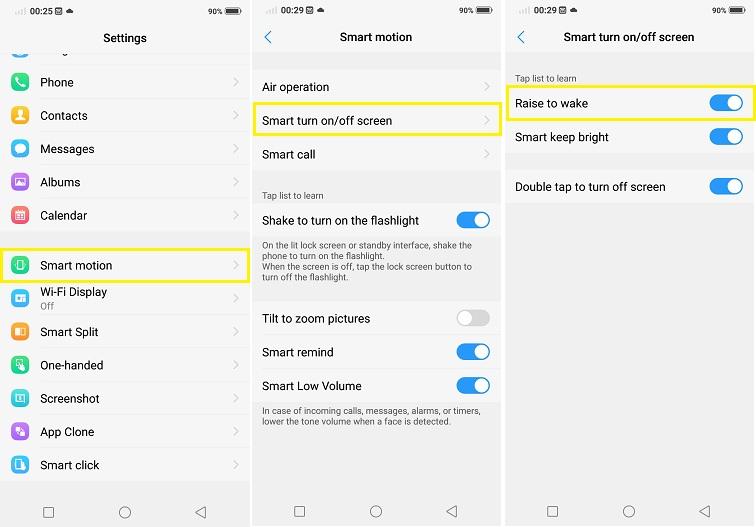
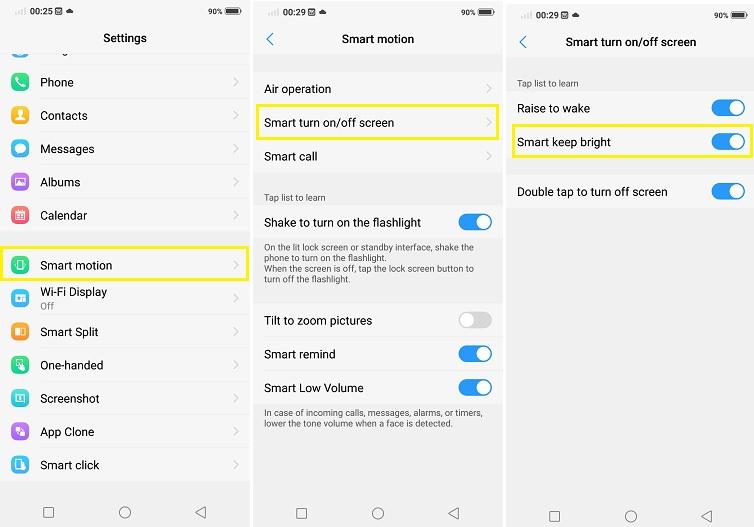
- Smart Keep Bright: If you enable this feature, it uses the front camera to see if you’re using the phone and keeps the screen on while you’re using it.
- There are a lot of smart call features: After enabling this, you can put the phone near your ear to answer the call.
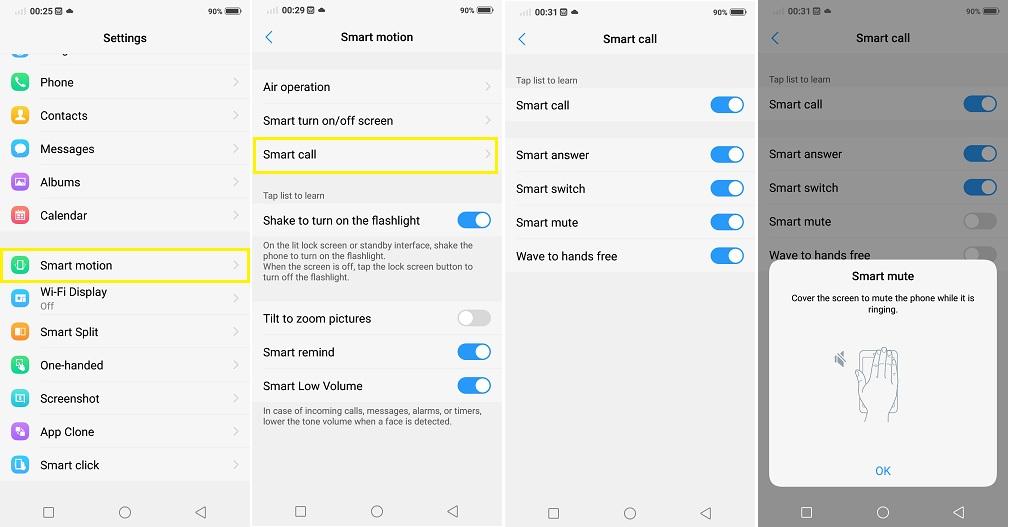
Hold it in hand to turn on the speaker mode.
Wave over the proximity sensor to answer the call.
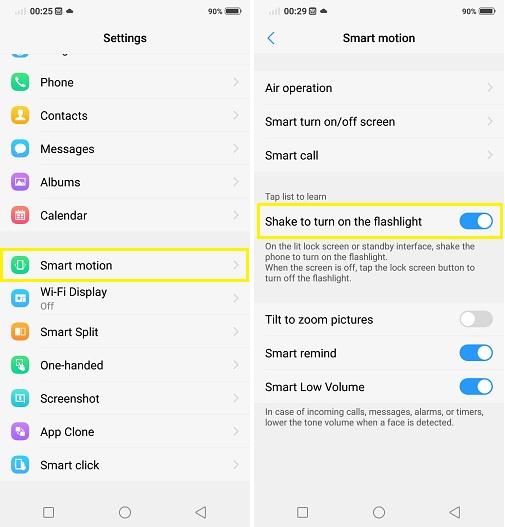
This helps a lot to make things easier. - Shake to turn on the flash: Once you enable this feature, you can just shake the phone to turn on the flashlight from lock screen or home screen, and just press the power button to turn it off.
- Smart Remind: After enabling this feature, you get a gentle reminder about the missed calls or notifications you got, as soon as you pick up the phone.

- Smart Low Volume: After you enable this, the volume of timers, alarms and ringtones go down automatically once it sees your face.
- Super Screenshots: Once you turn this on, you can just go to control center and press S-Capture option. From here, you can take Long Screenshots, Rectangular Screenshots, Free-Hand Doodling Screenshot in any shape you want. And last but not the least, Screen-Recording is also available.
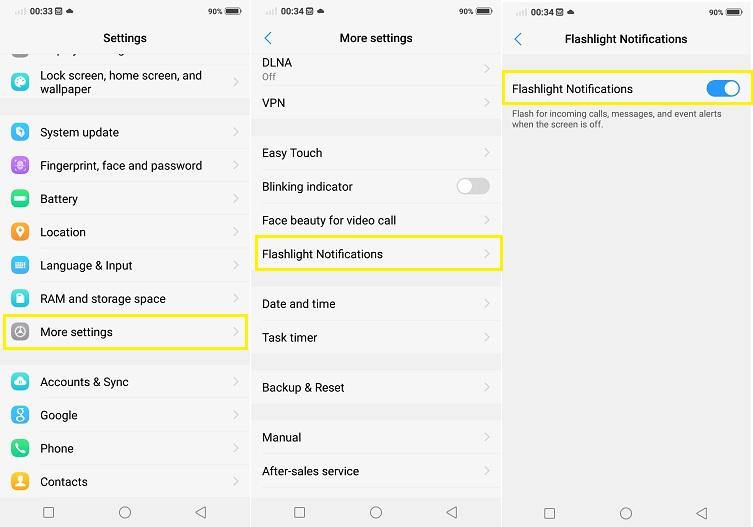
- Flashlight Notifications: Once you enable it, the led light at the back flickers when you get a call or message. Giving you a visible indication. This is useful when your phone is in silent mode.
- Easy Touch: You’ll get a floating bubble on screen, just like on the iPhone, with basic navigation gestures or you can even customize it to your needs.
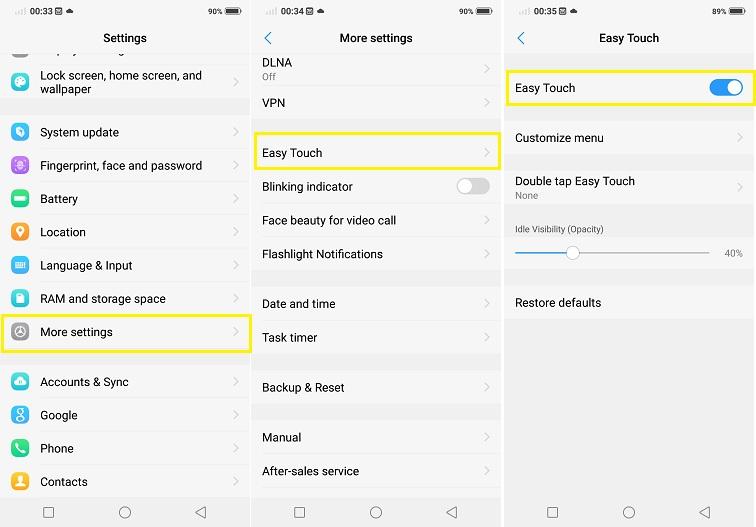
It looks something like this: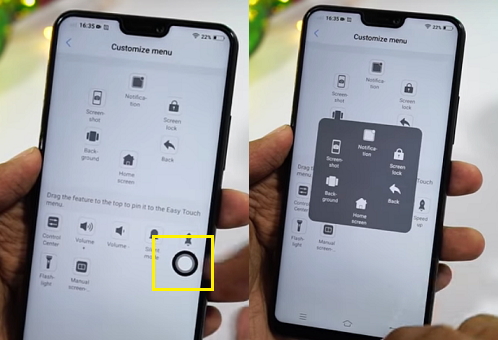
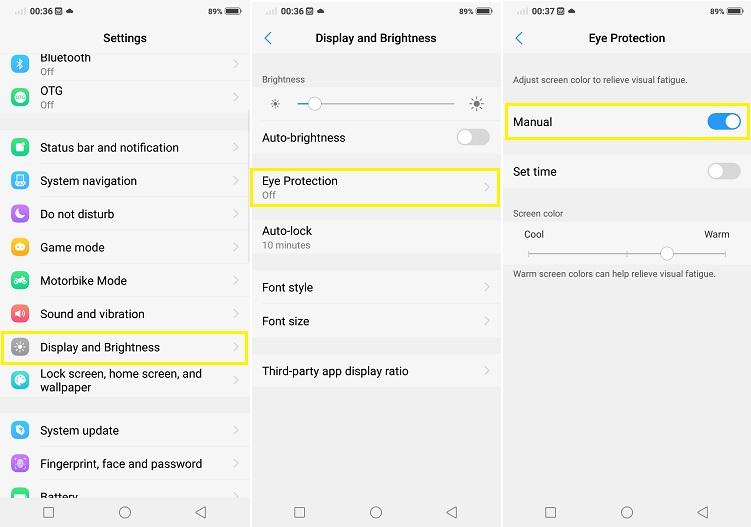
- Eye Protection: Enabling this feature makes the phone put a warm yellow tint on the screen to protect your eyes from the blue/white glare. You can even adjust the warmness or coolness of the tint to your specific needs.In few phones this is known as Night Mode or Reading Mode. This is a good feature as it protects your eyes from harmful rays of screen. Enable this mode at night (or even day) to let the screen go easy on your eyes.
- Game Mode: If you’re a gamer, this is totally what you’d need. It helps in keeping away the ‘distractions’ that might interrupt your gaming experience, by auto rejecting the calls, blocking all floating notifications, and disabling automatic Wi-Fi connection.
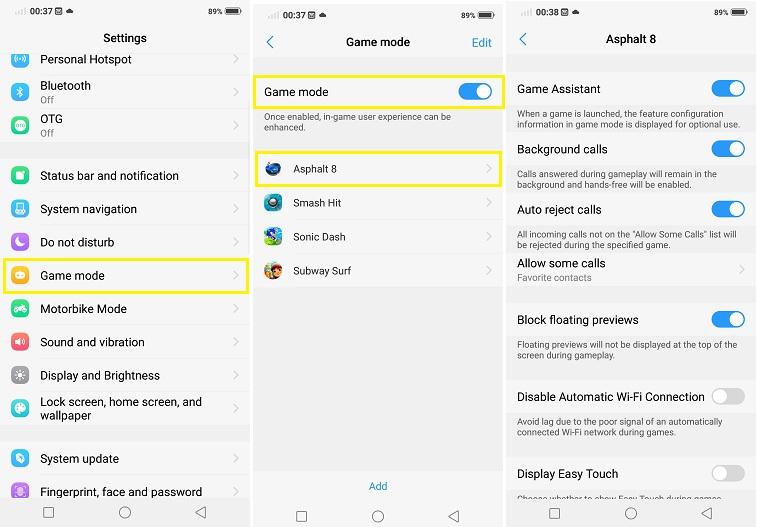
You can change the settings for a particular game or all games to allow few calls from important people. - Bike Mode: You can use this when you’re riding your bike or car, as it is self explanatory. You can change the settings to reject all calls or allow few important ones, or even reply back with a message.
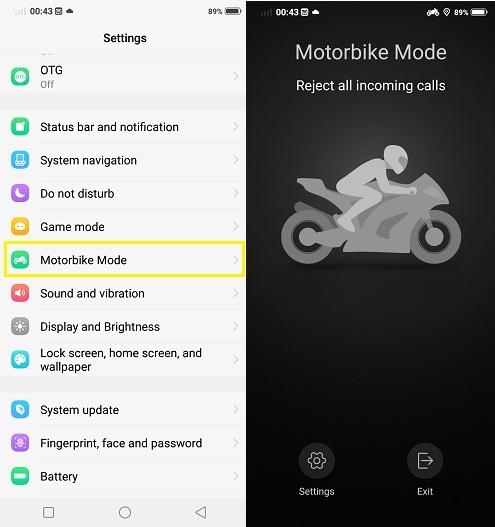
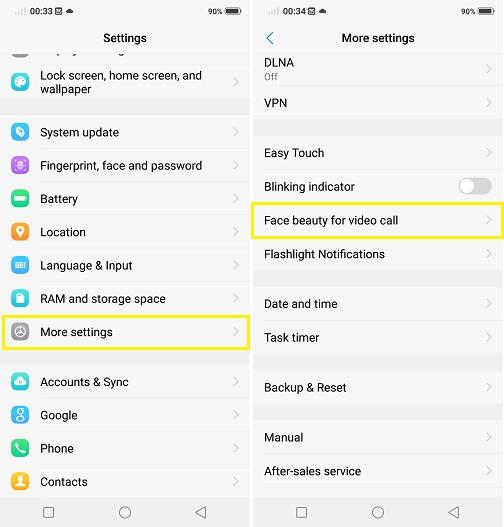
But, every time you have to manually turn it on or off. It would have been a lot convenient if it automatically turns on. - Face Beauty Mode: If you want to use Beauty mode for some reason, while using Third Party Video Calling Apps, this feature will be useful. This is a unique feature to Vivo and Oppo phones.
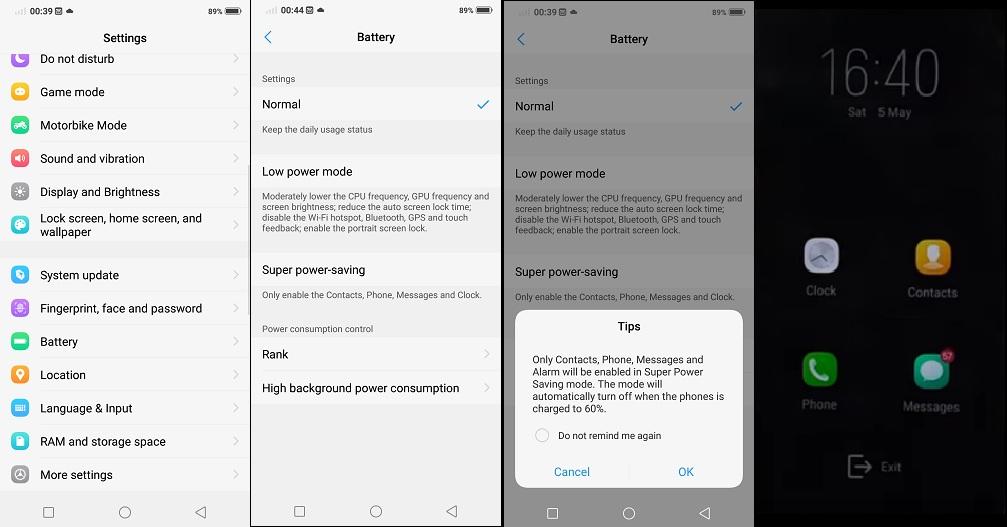
- Super Power Saving Mode: In this mode, you can save a lot of battery especially when you’re running low. Enable this and it only gives you limited options like, Calling, Messaging, Clock and Contacts and kills all other applications for time being. This way you save a ton of battery life in emergency situations.
- App Lock: You can protect your apps with this feature. Once you enable this, it locks the apps you want to lock. You can unlock an app using fingerprint or password or facial recognition system that’s available in this device.
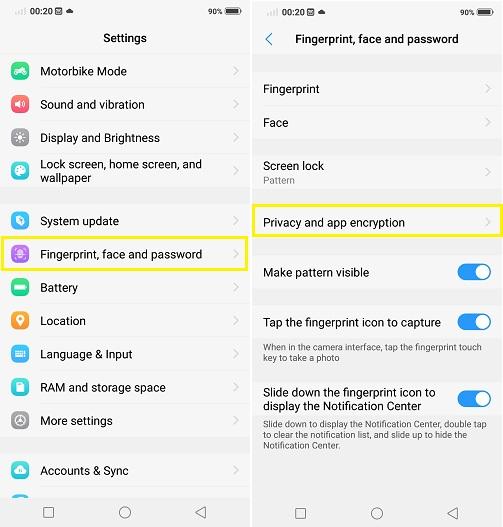
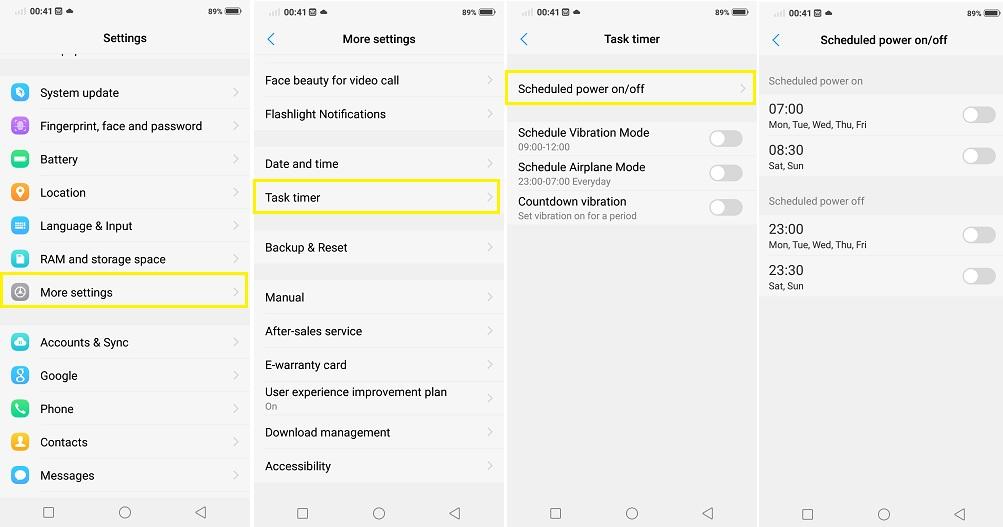
The first time you’re opening it, it asks you to set the password and then you can select apps that you want to put lock on. - Task Timer: It’s called Schedule Power on/off mode on other phones. You can schedule the phone to power on or power off at specific times. You can even schedule to switch on the Vibration mode or Airplane mode for a certain period of time.
- Network Management: If you want to disable internet access to a specific application in your phone you can use this setting. This might come in handy to stop accidental in-game purchases or even advertisements.
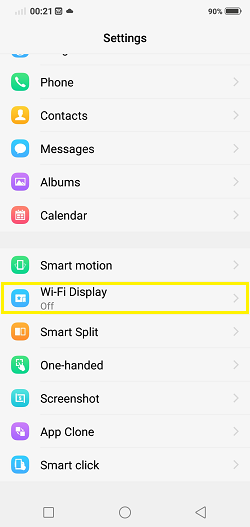
- Wireless Display: This feature can be used to cast the phone screen onto a smart TV or chrome-cast. It’s great to have an option to enjoy small screen content on a larger screen.
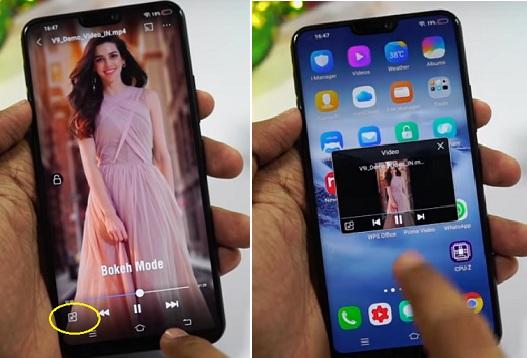
- Floating Video Player: You can use this feature from the stock video player to see a floating window of the video over other apps.
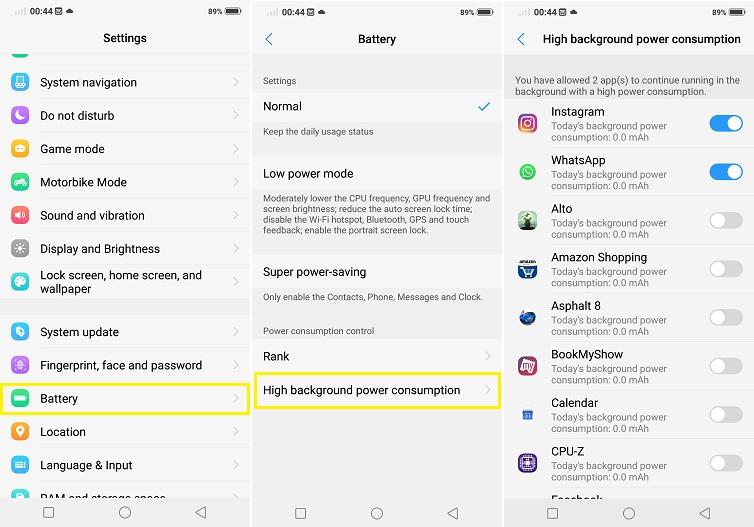
- Background Apps: The background apps are killed after sometime, but if you want one or more apps to not be killed, you can white-list them with this.
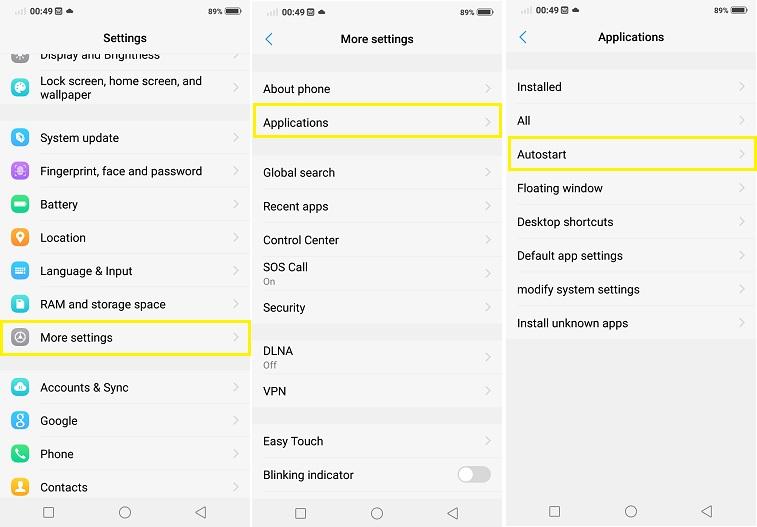
- Auto Start Management: Normally when you kill applications in the recent apps page, some restart and run in the background. By enabling this feature, you can control what apps can and cannot restart. Doing this will improve your battery life.
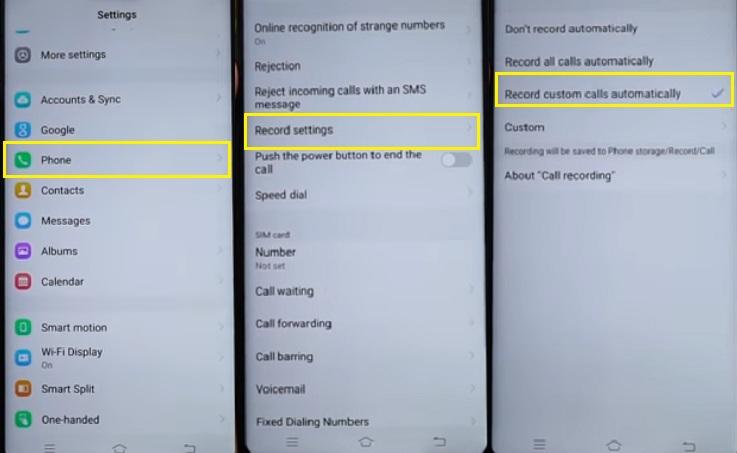
- Auto Call Recording: If you want to record all your calls or selected calls, you can enable this feature to record the calls.
Tips and Tricks:
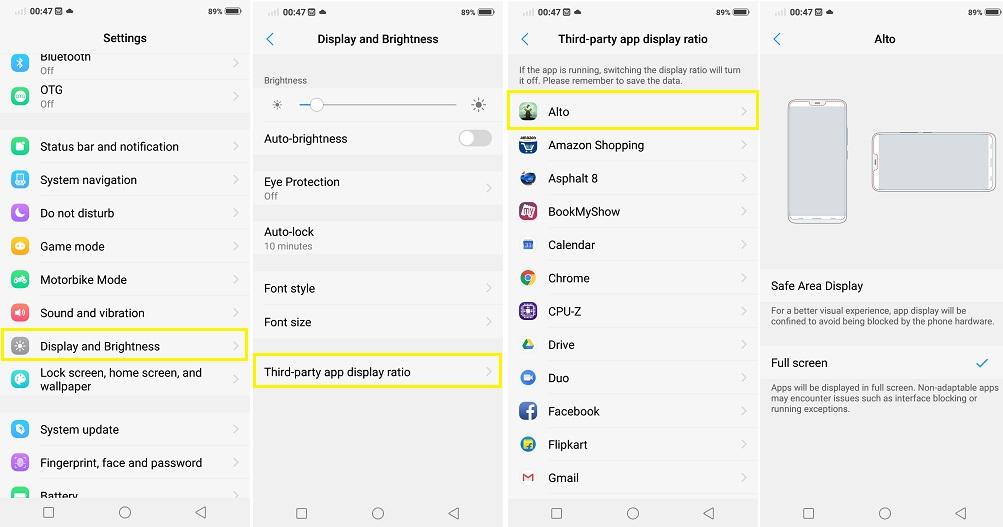
- Make Apps Full Screen: Whenever you open an app, by default the phone just puts a black bar on top, where the notch goes. But, to utilize the entire display, you can enable this feature to see even beside the notch. It’d just feel more immersive.
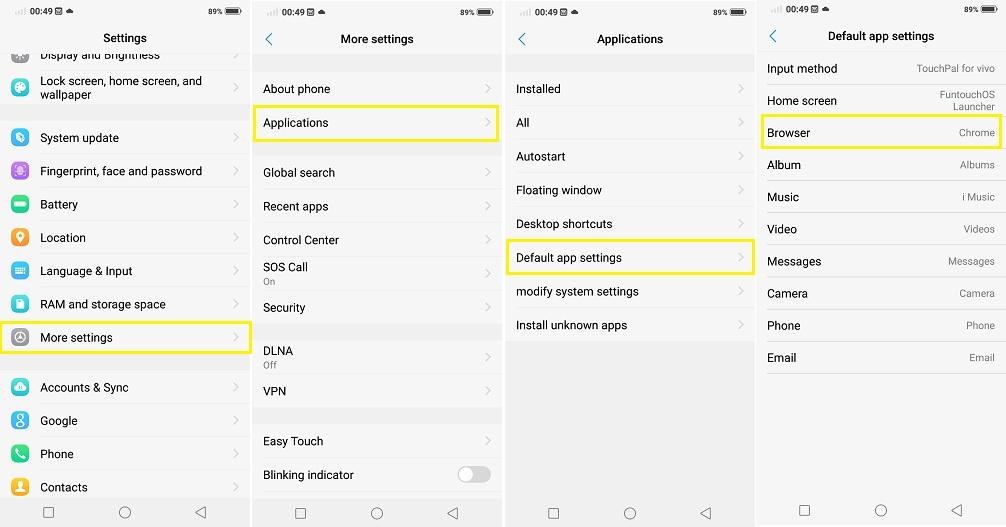
- Change the Default Apps: The default browser is not that great. So, you can change that in the settings to the browser you want. While you’re there, you can even select Nova Launcher (if you’ve installed it) as a default option under Home Screen, so it’ll take you to Nova Launcher when you press home button.
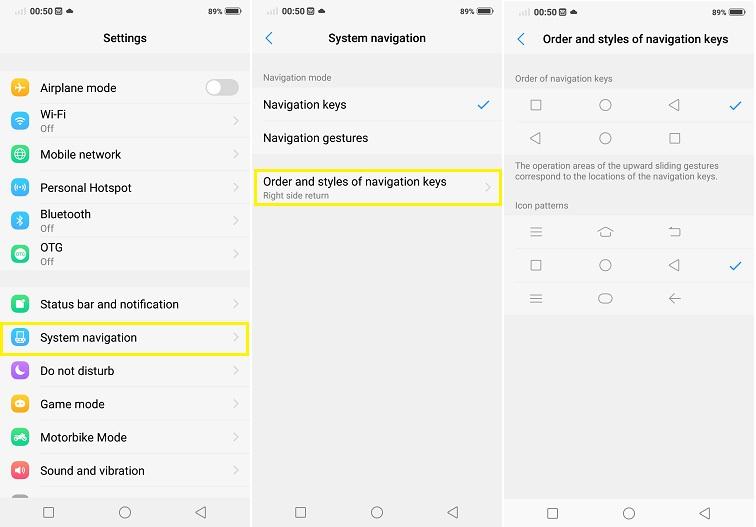
- Rearrange On-Screen Navigation Buttons: In this you can select how the navigation buttons can appear or in what order.
- Heads Up Notification: If you want to turn off the notification pop ups on top of the screen, you can disable it using this setting. It’s a great thing to turn off all the notification pop-ups at once.
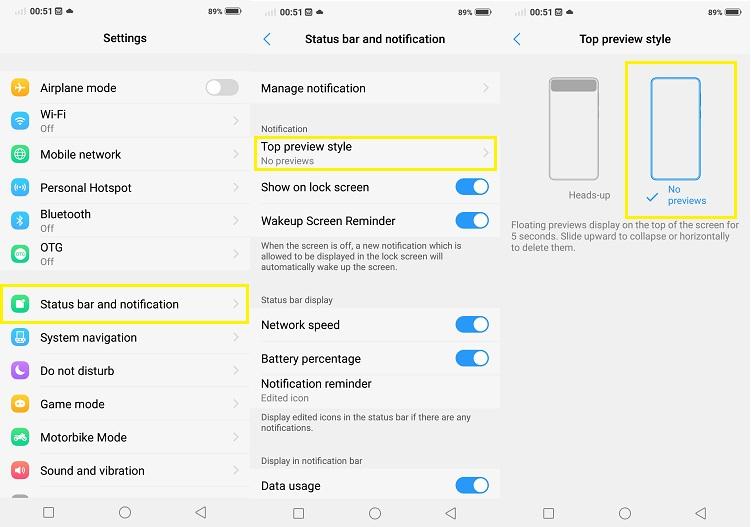
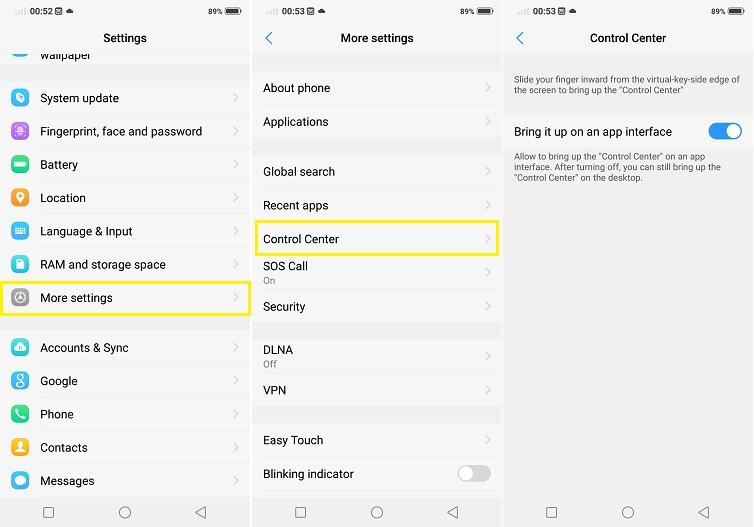
The notifications are still visible once you swipe down the notification bar.While you’re there, you can toggle the Battery percentage indicator and even the Network speed indicator. Which just shows or hides the number of percentage or speed. - Disable Control Center: It’d be annoying if control center pops out of nowhere while playing a game. So, you can just disable it to avoid that. And to access it, you’d have to go to home screen.
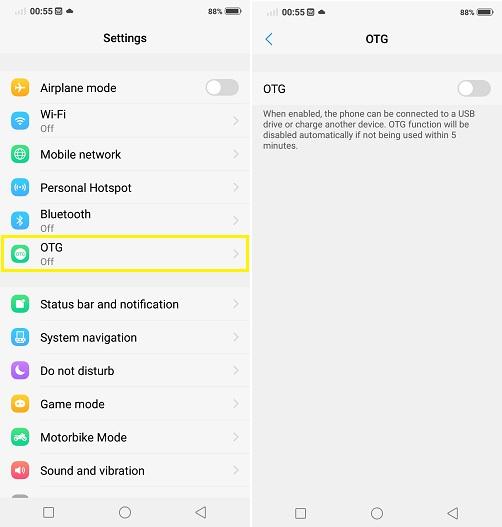
- OTG: To connect USB device to your phone, you have to enable this setting, as it’s disabled by default.
- Blinking Indicator: The notch on top has an LED notification light and if you want to use it, you can enable the Blinking Indicator.
 There is a lot more to watch, go and subscribe to GreedyTech on YouTube. Also, these are covered in the video and if you want to watch it, which you can find at the beginning of this post.


